Monday, September 29, 2008

...Back Trading the Asian Breakout

My apologies to those of you who have been checking this blog to see how the updated strategy was doing. I was out of town and out of the country for much of the summer, and didn't have much time to devote to trading. However, I'm back now and should be back up and running how I'd like to be within a week or two. For now, the good news is that I've been trading the strategy revisions I outlined in my last post for the last two weeks, and it's been going well. Since September 15th, the strategy is up 255 pips.

Feel free to check out the Daily Trades Spreadsheet to see how things are going by pair. I haven't been making much commentary on these as of right now, but all the trades and results are recorded. Stay tuned as I will be planning to devote a bit of time to discuss risk management strategy soon as I continue to test the new trading strategy. If all continues to go well, I'm looking to open a live account within the next month or two.

Monday, June 2, 2008

Trading Results, 5/26 - 5/30 and Breakout Strategy Revision

Here are my forex trading results from this week:

Week 5 (5/26 to 5/30): -59 pips

Results by pair for the week: GBP/USD down 55 pips, USD/JPY down 32 pips, EUR/JPY up 56 pips, GBP/JPY down 28 pips.

I didn't record the total pips to date in this week's post because I'm working on changes to the basic strategy, as I talked about in last week's post. This week, I didn't follow a set strategy, but rather went on my gut based on support and resistance levels. I didn't do great, but I did beat what the basic strategy would have produced by 220 pips (the basic strategy, which works fine in most market conditions, was down 279 pips this week, as the forex markets continue to fight several tough technical levels). Most importantly, upon reviewing this week's trades, I was able to make what I think will be some good edits to the basic strategy that should make it more profitable in all market conditions (make sure to see the details below).

Analysis:

1. One quick thing to note is the effect that Memorial Day had on market volatility. It was down across the board, but was virtually quiet in the US session, which makes profitability on a breakout strategy awful tough. I had to close out a record 3 trades manually (i.e. they didn't hit SL or TP by 4pm EST). Had I not traded at all, I would have been profitable for the week. So, next year, I think I'll take Memorial Day off with the rest of the traders.

2. I'm only going to include one chart this week just to reinforce the points I made last week about the importance of support and resistance levels in the forex market.


The above chart is from the GBP/USD from Tuesday. The set-up period is in between the yellow bars. When I looked at this, I saw that the pair didn't have much room to the resistance above, but did have some room before hitting the below support. Thus, I only placed the sell entry order, and not the buy. As you can see, that paid off, as the pair started up, but reversed when it began getting close to resistance. It then had a good run down and made it to my TP with no trouble.

Strategy revisions:

OK, here are the proposed revisions to the basic asian breakout strategy. On a quick back test (past two weeks), it looks good. On the four pairs I'm trading, it produced less overall trades, but was much more profitable. This past week, the following would have produced 7 wins and 5 losses for a gain of 150 pips. Two weeks ago, it would have produced 6 wins and 1 loss for a gain of 220 pips.

Here are the changes:

1. ONLY trade WITHIN the current support and resistance channel
(i.e. whatever S/R lines the candles are in between at the time of set-up is where you consider trading. If the bars have not broken above resistance or below support during the set-up period (22:00 to 5:00 GMT), the TP level for a buy or a sell must be within that channel. If the candles have broken resistance or support, however, then you can place your entry and TP based on the next channel)

2. If the market is in a clear TREND (defined as trending on both the 4-hr and 1-hr charts), ONLY trade IN THE DIRECTION OF THE TREND. If it's not trending, trade either way.

3. Set Take Profit and Stop Loss based on the following for pairs GBP/USD, EUR/JPY, and
USD/JPY:

  1. If there is less than 40 pips room from entry to the nearest support or resistance line--> NO TRADE
  2. If 40-59 pips from entry to the nearest S/R line --> set Take Profit/Stop Loss at 30/20.
  3. If 60+ pips from entry to the nearest S/R line --> set TP/SL at 45/30.
  4. If 3 or more candles on the 1-hr chart are touching a line of support or resistance, set TP/SL levels at 30/20 regardless of distance from the nearest S/L line.

4. For GBP/JPY, follow these rules:
  1. If there is less than 60 pips room from entry to the nearest S/L line --> NO TRADE
  2. If 61-79 pips from entry to the nearest S/R line --> set TP/SL at 45/30.
  3. If 80+ pips from entry to the nearest S/R line --> set TP/SL at 60/40.
  4. If 3 or more candles on the 1-hr chart are touching a line of support or resistance, NO TRADE.

This is how I will be trading this week. Hopefully it will continue the results it produced during the backtest.

Here's a couple of other things on my mind that I'm thinking about incorporating into the strategy:

1. Using Fibonacci Levels and/or Pivots to supplement support and resistance.

2. Money management such that each trade would represent the same percentage win/loss of account size...i.e. change the lot size based on the number of pips of your TP/SL so that your TP/SL always represents 3%/2% of your total account size.

That's it for this week. Check back next weekend to see how this strategy is doing. In the meantime, remember you can get brief updates by looking at my Daily Trades Spreadsheet.

Sunday, May 25, 2008

Trading Results, 5/19 - 5/23

Here are my forex trading results from this week:

Week 4 (5/19 to 5/23): -127 pips

Total to date: -292 pips

Results by pair for the week: GBP/USD down 127 pips, USD/JPY down 30 pips, EUR/JPY up 90 pips, GBP/JPY down 60 pips.

Analysis:

While it was a down week, it certainly reinforced the points that I made after reviewing the trades from last week. There, I noted how much support and resistance levels were affecting the market, and that my basic strategy wasn't working as well because nearly all of the charts of the pairs I'm trading had moved into areas with a lot of crossing support and resistance lines. My trades were bouncing off these lines left and right, and as I wasn't looking for it, I lost a lot of them.

This week, I decided not to change my basic strategy just yet, and to monitor the support and resistance lines to see if it would explain why my trades performed the way that they did.

Well, it did--surprisingly well, actually. Upon my review of my trades for the week, I only found one or two examples of trades that failed for a reason other than bouncing off of a support and resistance line. Monday, for example, was my worst day ever, down 180 pips, and I shouldn't have set up 7 out of the 8 trades I set up based on S/R levels. By the end of the week (Thursday and Friday), most of the pairs were moving out of the channel they went into early last week (i.e. less S and R lines around), and I was up 57 pips over those two days using just the basic strategy.

You can see a brief summary of all of my daily trades on my Daily Trades Spreadsheet. For this post, I'm going to run through an example of what I'm talking about above, going day by day using EUR/JPY as an example.

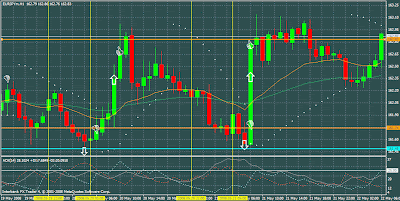
First, here's a 4-hour chart of how EUR/JPY looked coming into the week (the support and resistance lines were drawn from the daily chart...the light blue one is the strongest as it had been tested multiple times on both sides).


Now, the trades:

Monday 5/19:


From the high and low of the 22:00 to 5:00 session (indicated between the yellow lines), the price only had less than 30 pips to move up before hitting resistance and less than 20 pips to move down to before hitting support, respectively. As you can see, price brokedown (at the white down arrow sign), came within a few pips of support, and turned around, making it back up to hit my stop loss (at the white thumbs-down sign). Down 30 pips on the day.

Tuesday 5/20:


Here, you can see the sell order should never have been placed, as the price was just about to the blue support line. It was tripped, the price turned around, and it hit my stop loss. The buy order, however, was correctly placed, as there was about 60 pips room up, and it hit the TP, as you can see. Up 15 pips on the day.

Wednesday 5/21:


As you can see, almost an exact repeat of the day before. Only the buy order should have been placed. Up 15 pips on the day.

Thursday 5/22:


Here we got lucky. The buy order was placed, though it shouldn't have been, and it did win, as price action broke through resistance. Note how long it took for it to finally break through though. The stop order was within a few pips of being tripped. A safer alternative to that trade would have been to place the buy entry a couple pips above the previous day's near double high of 163.14. This would have avoided the resistance line (and we would have been protected if price reversed), yet it still would have been more than sufficient to net us a TP of 45 pips. Up 45 pips on the day.

Friday 5/23:


Both buy and sell orders would have been fine to place, as there wasn't any resistance or support within 70 pips. As you can see, just the sell side was activated, and the price moved down nicely to activate the TP before hitting the support below. Up 45 pips on the day.

So, all of the above traded with the basic strategy put the EUR/JPY up 90 pips on the week. But, as you can see from the examples above, a little attention to support and resistance levels could have easily made that up 180 pips, doubling the profits for the week.

As I said before, EUR/JPY was just an example. Every pair would have benefited from this strategy...see my comments on my Daily Trades Spreadsheet to get an idea how.

So, how does this change the overall strategy?

Well, while I'm becoming quite convinced that respect for support and resistance levels must become a part of my final strategy, I'm not sure exactly how I'm going to implement it. This is because I'd like to come as close to a rule-based, mechanized system as possible. That makes it easier to back-test, easier to analyze, and most importantly, easier to implement. Nonetheless, this week, I'm going to deviate a bit from the basic strategy to place trades based more like what I talk about in this article. I'll still be keeping a keen eye on the performance of each trade and will report on the progress next week. In the interim, feel free to get brief updates in my comments on the spreadsheet.

Saturday, May 24, 2008

Support and Resistance Article

In my post on the results from last week, I talked a lot about support and resistance in the Forex market. Here's an article on support and resistance from Forex Focus. It's great background for those not too familiar with how support and resistance works, or how to draw support and resistance lines. Even if you feel comfortable with this, it's still a great read, even if just for reminding how powerful this technical indicator can be in Forex. Note I've also posted the article in the side bar under Resources.

Stay tuned for my review of trading from this week. Hopefully I'll have it up sometime tomorrow.

Thursday, May 22, 2008

Daily Trades Spreadsheet Added

Just a quick post to announce that I've added a link to my Daily Trades Spreadsheet in a new "Resources" section in the right column of this blog. I tend to update this spreadsheet almost everyday with how each pair did and with some comments. This I basically just keep for my own reference, and doesn't have the level of analysis that I put into my weekly posts, so forgive it if it seems haphazard. But, feel free to check it out if you want to see how trading is going in between postings.

Wednesday, May 21, 2008

Why Trading Was Bad Last Week

My Forex trading results from last week were a bit of a disappointment to the Asian Breakout strategy I'm currently using. The GBP/USD was hurt the most, and after reviewing the past couple weeks of trading, it's pretty clear why. The Asian Breakout strategy is a solid one, but it is not immune to the technical players in the Forex market. One big one in that regard that was a major player last week was that of Support and Resistance.

I'll get right into it. Here's a chart daily chart of the GBP/USD leading up to last week's trading:


On it, the orange lines represent, from top to bottom, downtrend resistance, downtrend support, and horizontal support. The light blue lines are lines that have been tested at both support and resistance. Generally speaking, these lines will be strongest over the long term. As a general rule for drawing support and resistance lines, you can draw a line with two points touching it, but a line with three or more will be stronger and more reliable. You can see some lines on the above chart have been tested five or more times. Note also for horizontal support the tendency of lines to show up at psychological levels. The three I have drawn above are quite close to 194.00, 195.00, and 196.00. (You'll also see these lines at .25, .50, .75, especially on the JPY pairs...but that's a post for another day.)

OK, let's compare how trades set up two weeks ago on the GBP/USD, when I was profitable every day, to last week, when I was on the losing side almost every day on that pair. Here's one trade from the profitable week:


It's a 30 minute chart, a smaller timescale view of the chart above. The area between the vertical yellow lines was the region I was looking at to set up the trades, putting a buy stop 4 pips above the high for that period and a sell stop 4 pips below the low for that period. (Ignore the horizontal gray and white lines...they're just current price when I took a picture of the chart). Note how there are no support or resistance lines to be found anywhere on the chart. This means that there should be pretty normal price motion, and I should be able to set up my take profit:stop loss levels of 45 pips:30 pips, as usual. As you can see, the price first moved down and continued to my take profit level, then reversed up, activated the buy, but then came down to my stop loss. Given my TP/SL levels, though, I still ended up 15 pips on the day.

Let's look at another trade from the same week:


This time, we see a resistance line creeping into the picture, but it's still around 75 pips below the level of my breakout sell point. As my take profit is 45 pips, and still 30 pips from the support line, it still would have been safe to place that trade. The trade above would have also been considered valid. That day prices moved down and continued down, triggered just the sell side of things, so I finished out up 45 pips on the day.

Now, let's compare that week to last week. Here's an example of one trade:


Pay close attention to the scale, as it's different than in the above charts (you can click on them for a bigger view). Upon setup, we see that a resistance and support line are binding the range within just 100 pips. Setting the breakout levels as usual, that leaves less than 25 pips up to the resistance line, and less than 25 pips down to the support line. Price action triggered both buy and sell orders, and as my TPs were still set at 45 pips and price wasn't successful at breaking beyond the S/R levels, I got stopped out of both orders, for a loss of 60 pips on the day.

Here's another trade:


Note that we're still in the same 100 pip channel that we were on the previous trade. Upon setup, that left less than 35 pips up to the resistance line, and less than 25 pips down to the support line. Again, price broke out in both directions, but both the resistance and the support held (Note how well the lines were respected this time). Again, I got stopped out of both trades and ended up down 60 pips on the day.

So, what have I learned? In short, that I need to be paying attention to Support and Resistance lines, as they are certainly big factors in the highly technically driven Forex market. I'm not quite sure how I'm going to implement it yet, but I'm almost sure it will become part of my strategy.

For now, I'm still not going to make any changes to my original strategy. I want to watch the charts for at least another week before I do. I will likely either not take trades on the days when I would be trading into a line as in the last two examples above, or perhaps shoot for a more modest target (i.e. try to scalp 10 pips on the breakout). We'll see in time, as I'll be paying attention to it, and posting about what I find, of course.

Saturday, May 17, 2008

Trading Results, 5/12 - 5/16

Well, I got pretty much crushed this week. Here's the results:

Week 3 (Mon 5/12 - Fri 5/16): -285 pips

Total to date: -165 pips

I may have spoken too soon on the cable, as GBP/USD was the heartbreaker this week, down 225 pips with four days in a row of losing on both buy and sell orders. The USD/JPY was up 15 pips on the week, the EUR/JPY down 15 pips, and the GBP/JPY down 60 pips.

Analysis:

1. It was a disappointing week of trading, but not without a few lessons. Upon reviewing the charts, it seems that several of the pairs saw the EMA 14 and EMA 55 tighten up on multiple time frames, and support and resistance became key players.

2. Trading GBP/JPY with take profit at 90 pips and stop loss at 60 as I considered last week would have resulted in a loss of 30 pips instead of 60. It's worth noting, however, that I think what I mentioned in #1 above had an effect on this.

I'm going to go into a lot more detail about what I noticed on #1 and how it might affect my trading in a follow-up post. I'll be looking at the EMAs I mentioned and discussing support and resistance, and will post some examples from this week's charts.